Survey Customization and Advanced Features
This section provides a guide to customizing and enhancing your survey experience using advanced features. It covers the configuration of key components such as Survey Login, Quota Management Messages, Survey Closed Notifications and Unsubscribe Confirmation Messages to tailor communication with respondents.
In addition, it introduces the use of skip logic and advanced branching techniques to design dynamic survey flows that respond intelligently to participant inputs. The Managing Data Transfer feature explains how to seamlessly move data within your survey — including carrying forward responses, piping selected choices into a dynamic matrix, and syncing data across fields using a Join Identifier to deliver a cohesive and personalized respondent experience.
NOTE: Any customization or modification made to the survey messaging modules (e.g., FAQ, Unsubscribe, Privacy Policy, etc.) will apply globally and impact all surveys for the client or account you are working on. Ensure changes are reviewed carefully before implementation.
Authentication Customization
To create a more seamless and engaging user experience, you can fully customize the survey's appearance from beginning to end. Start by navigating to the toolbar menu at the top-left corner of your screen. Click on 'Survey Messaging', and select the ‘Authentication’ tab.


The Authentication feature enables you to secure your surveys by requiring respondents to log in with a username and password before accessing the survey. This ensures that only authorized users can participate, adding an extra layer of security and control to your data collection.
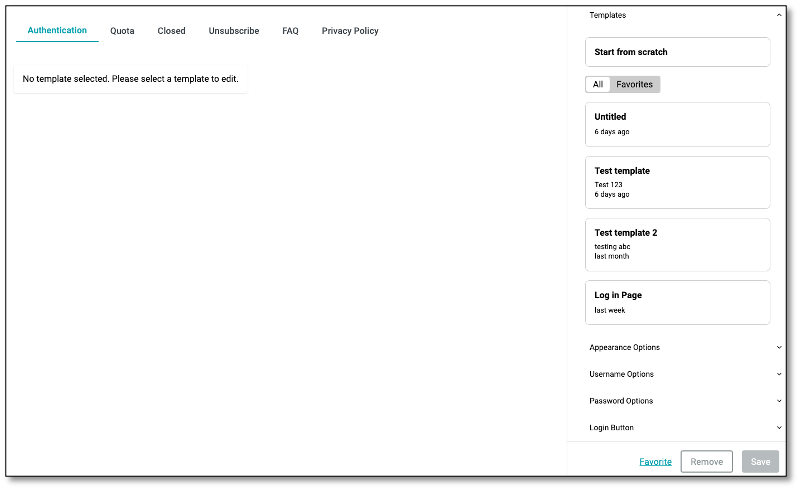
The Authentication setup provides customizable templates that allow you to brand the login experience, modify placeholder text, and control the appearance of the login screen.
Key Components and Configuration
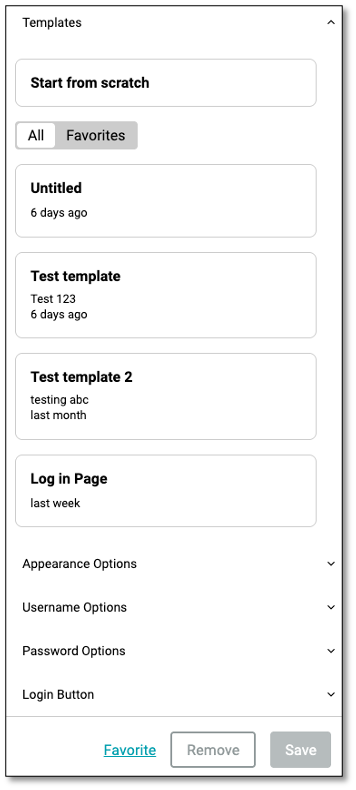
Templates Panel
- Choose from saved templates or start from scratch to build a new authentication page.
- Use the Favorites toggle to filter your preferred templates.
- Options:
- Favorite – Mark a template as a favorite for easy access.
- Remove – Delete the selected template.
- Save – Save your changes to the current template.
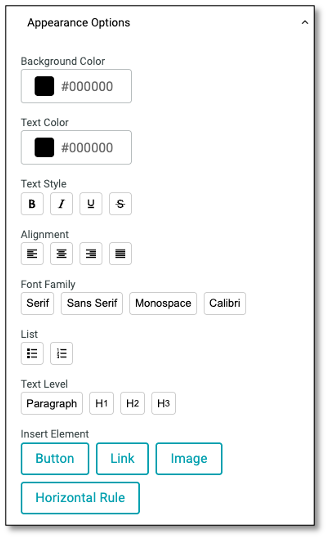
Appearance Options
Customize the overall look and feel of the login page to match your brand:
- Background Color – Set the background of the login page.
- Text Color – Define the default font color.
- Text Style – Apply bold, italic, underline, or strikethrough.
- Alignment – Choose left, center, or right text alignment.
- Font Family – Select from serif, sans serif, monospace, or Calibri.
- Lists & Headings – Add bullets, numbers, or heading styles (H1, H2, H3).
- Insert Elements – Add a button, link, image, or horizontal rule to enhance layout.
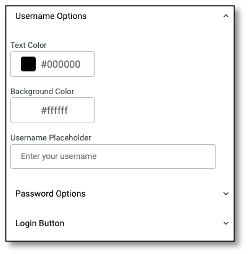
Username Options
Customize the username field displayed to the respondent:
- Text Color / Background Color – Define field appearance.
- Username Placeholder – Customize the placeholder text (e.g., "Enter your username").
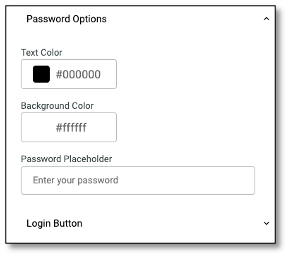
Password Options
Customize the password entry field:
- Text Color / Background Color – Define input field colors.
- Password Placeholder – Set guidance text (e.g., "Enter your password").
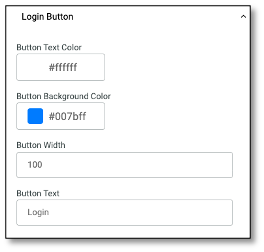
Login Button
Style and label the login button:
- Button Text Color – Color of the button text.
- Button Background Color – Background of the button (e.g., brand color).
- Button Width – Define pixel width for the login button.
- Button Text – Customize the label (e.g., "Login", "Continue").
Quota Management Message Configuration
The Quota tab allows you to configure a custom message that will be shown to respondents once the survey’s response limit has been reached. This helps inform users that the survey is no longer accepting additional responses due to quota fulfillment.
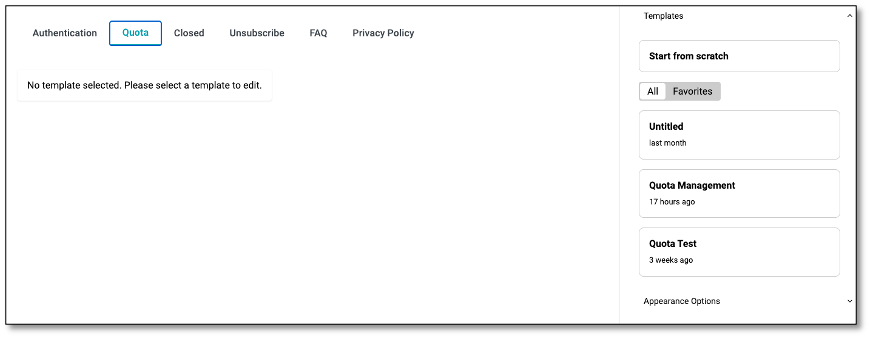
- Templates – Choose from existing templates or start from scratch.
- Favorites Filter – Easily find your preferred templates using the Favorites toggle.
- Appearance Options – Customize the design, including text and background colors, font styles, and layout formatting.
NOTE: Use this feature to maintain a consistent and branded experience even after survey limits are met.
Survey Closed Notification Message
The Closed tab allows you to create a custom message that will be displayed when the survey is no longer available. Either due to manual closure or the end of the active survey period. This ensures respondents are clearly informed that the survey is no longer accepting responses.
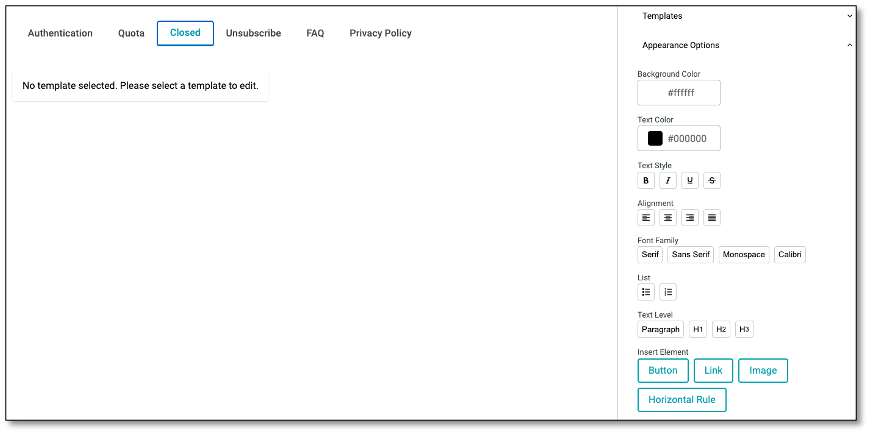
- Custom Templates – Build or select a message template to inform users that the survey has ended.
- Appearance Options – Modify background color, text color, font style, alignment, and insert elements like buttons, links, or images to maintain a branded and user-friendly notification.
- Text Styling Tools – Apply formatting such as headings, bullets, alignment, and font types for clear communication.
Unsubscribe Confirmation Message
The Unsubscribe tab allows you to create a branded confirmation page that appears when a respondent chooses to opt out of future survey communications. This message confirms their action and ensures transparency around email preferences.
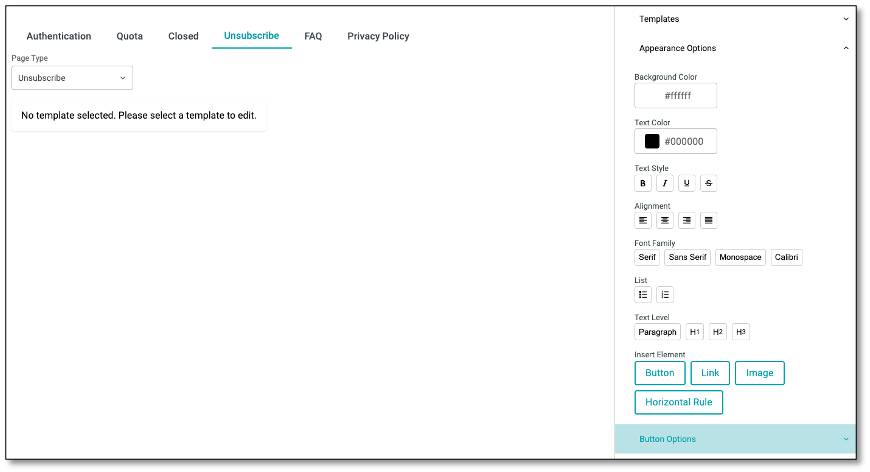
- Page Type Selection – Choose between Unsubscribe, Opt In, or Resubscribe, Opt Out based on the intent of the message.
- Template Editor – Select from saved templates or build your own unsubscribe page from scratch.
- Appearance Options – Customize layout using tools for background color, text color, font style, alignment, lists, and headers.
- Element Insertion – Add buttons, links, images, or horizontal dividers to enhance the visual structure.
- Button Options – Further configure the unsubscribe button to match branding and user interaction expectations.
NOTE: Use this feature to create a clear and respectful unsubscribe experience while aligning with your communication guidelines and compliance standards.
Designing Survey Flow
In this section, you will learn how to design a dynamic survey flow using skip logic, display logic, and branching logic in order to create a dynamic survey experience. These features allow you to tailor the survey path based on respondents’ answers, ensuring they see only the most relevant questions. This approach enhances the overall accuracy of your data and keeps participants more engaged throughout the survey.
- Skip Logic. Controls the survey flow by directing respondents to the most relevant questions based on their answers, helping them complete the survey more quickly.
- Display Logic. Shows or hides specific questions or sections in real time, depending on user input, creating a cleaner and more user-friendly experience.
- Branching Logic. Guides respondents through different survey paths based on their answers, allowing for customized routes, skipping, or early completion when appropriate.
Logic Module
The Logic module allows you to configure and manage the conditional flow of your survey by creating logical rules.
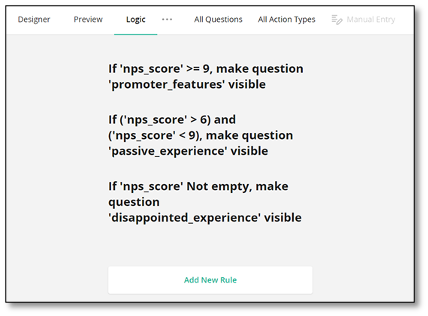
Add a New Rule
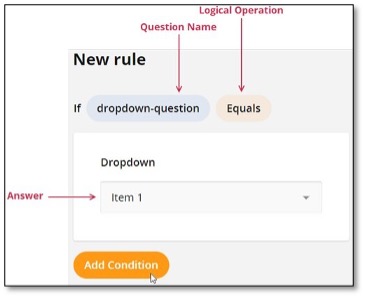
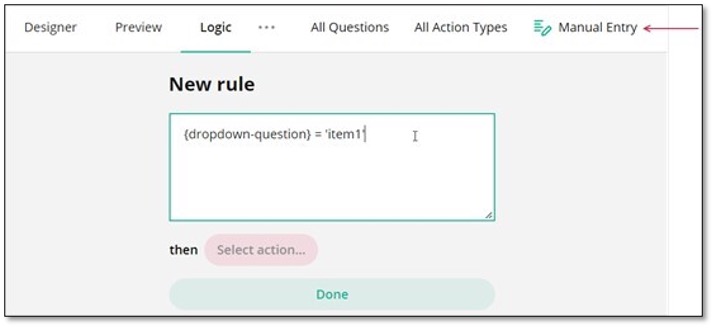
To add a new rule, click 'Add New Rule' at the bottom of the Logic module. This opens the editor where you can define conditions (the 'if' part of the rule) and the corresponding actions (the 'then' part).
Select a question to base the condition on, choose a logical operation (e.g., equals, not empty), and define the value that should trigger the rule. Use 'Add Condition' to include multiple conditions with AND/OR operators.
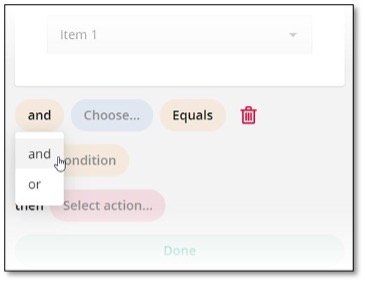
If the rule needs more than one condition, click the Add Condition button. You can use the AND or OR logical operator to combine the new and previous conditions.
Conditions that you specify in the Survey Builder are converted to logical expressions. If you prefer to enter the expressions directly, click the Manual Entry button on the Toolbar.
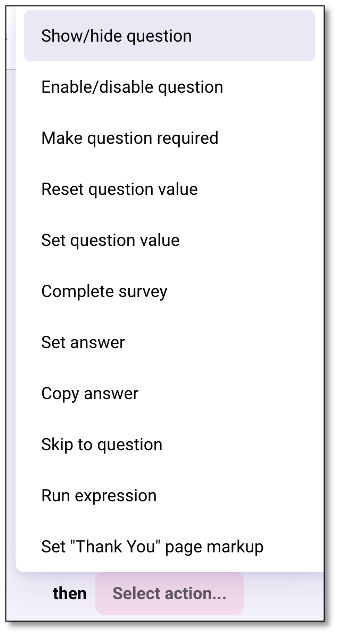
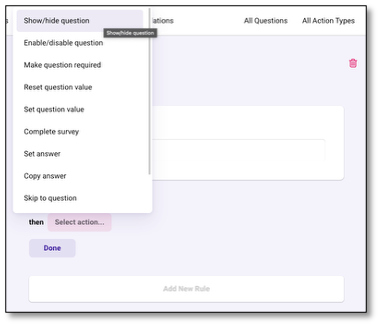
Specify the action (then-clause) Select one of the following actions from the drop-down menu:
- Show/hide question Makes the selected question visible. If you want to hide the question, invert the logic of your condition.
- Enable/disable question Makes the selected question editable. If you want to make the question read-only, invert the logic of your condition.
- Show/hide page Makes the selected page visible. If you want to hide the page, invert the logic of your condition.
- Enable/disable page Makes the selected page editable. If you want to make the page read-only, invert the logic of your condition.
- Make question required Requires an answer for the selected question
- Make page required Requires completion of all applicable questions on the selected page before moving forward.
- Reset question value Clears the existing answer or value of the selected question.
- Set question value Sets a custom value for a question; for example, updating a page title or message dynamically (e.g., changing “Survey Complete” to “Thank You”).
- Complete survey Completes the survey.
- Set answer Sets a specified answer to the selected question.
- Copy answer Copies the answer from the selected question to a target question.
- Skip to question Navigates the survey to the selected question.
- Run expression Runs a custom expression on the selected question.
- Set "Survey Complete" page markup Specifies custom HTML markup for the Survey Complete page.
- Set “Thank You” page markup Specifies custom HTML markup for the Thank You page that respondents see after completing the survey
Edit a Rule
Click a rule to expand it and use Survey Builder elements to edit the rule. Click Done to save your changes.
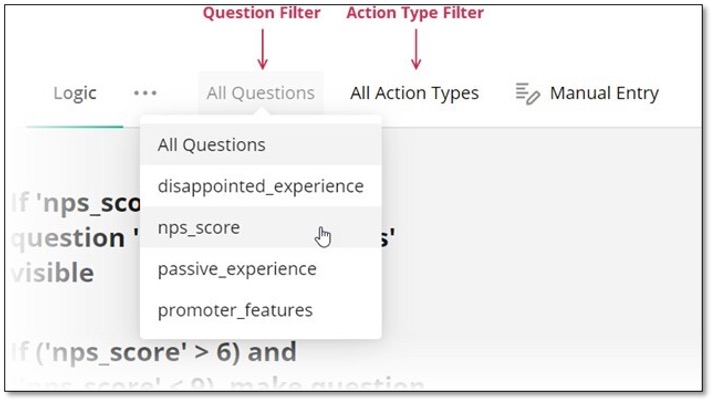
How to Filter Rules:
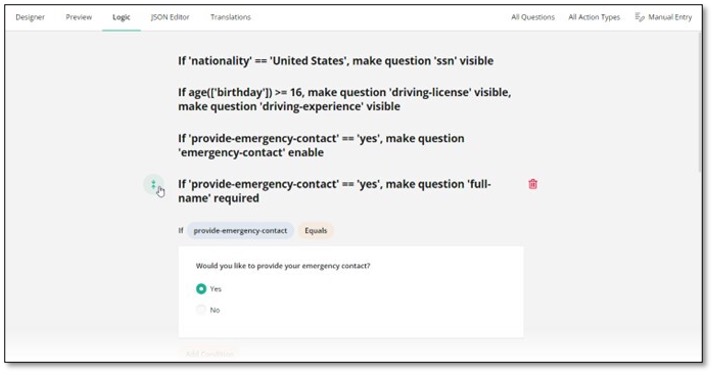
Use the Question Filter to filter rules by a specific question. You can also use the Action Type Filter to view only rules for the selected action type:
Skip Logic
Skip logic is a dynamic feature that allows you to control the flow of your forms based on respondents' answers. It ensures that your respondents are always prompted to answer the most relevant questions and complete surveys more quickly, providing a personalized survey experience.
An Overview on How it Functions
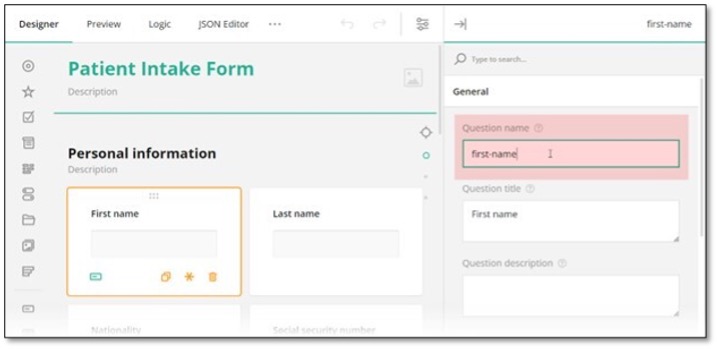
Question ID
Every input field added to your Survey Builder form is automatically assigned an ID. You can change this ID in the General settings of a question by entering a new value in the Question name property. This ID is not visible to respondents and is used in various form configurations, including skip logic setup.
If you choose to enter conditional rules and expressions manually, and they involve the value of a certain trigger question, use curly brackets to reference the question ID whose value you want to access, e.g., {driving-license} = true, where driving-license is the ID of the trigger question. Otherwise, use the graphical user interface (GUI) described below to set up your conditional logic without manual entry.
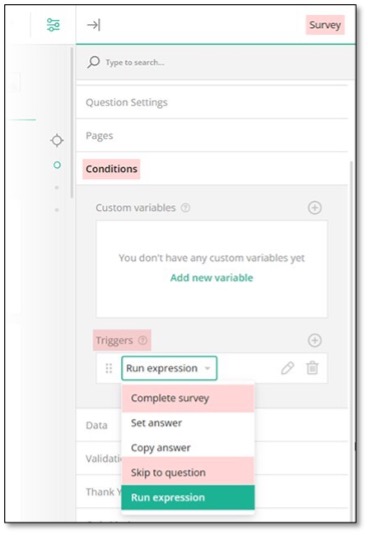
Triggers
A trigger is an event or condition that is based on an expression. Once the expression evaluates to true, a trigger sets off an action. Such an action can optionally have a target question it affects. In Survey Builder Form, two types of triggers allow you to set up skip logic in a form:
- Skip to question - Takes a respondent to a target question if a specified expression evaluates to true.
- Complete survey - Triggers survey completion if a specified expression evaluates to true.
Skip Logic Directions
Skip logic can be used to send respondents both forward and backward in the survey. By applying skip logic in reverse, participants can backtrack and provide answers to earlier sections or questions they initially left unanswered without navigating through the entire survey again.
Skip Logic Destinations
Based on a respondent's answer to the current question, Survey Builder allows you to redirect them to the "Thank you" page or one of the following destinations:
- A specific question within the same section (in Survey Builder referred to as a panel).
- A specific question within the same page.
- A specific question within a different section on the same page.
- A specific question within a different section on a different page.
- The "Thank you" page.
How to Add Skip Logic
Skip to Question
To redirect a respondent to a specific question in a form, follow the steps below:
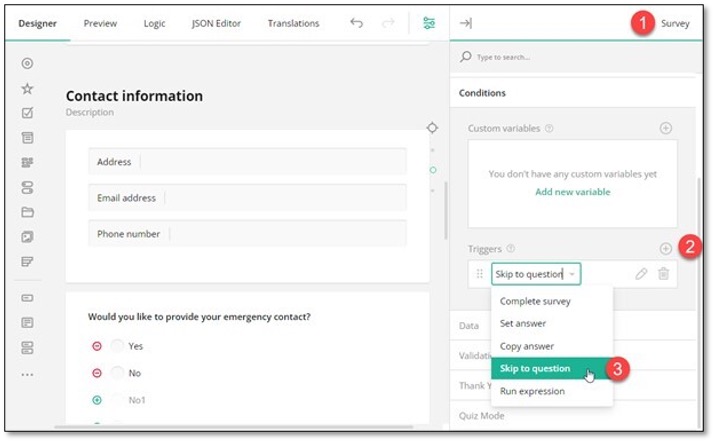
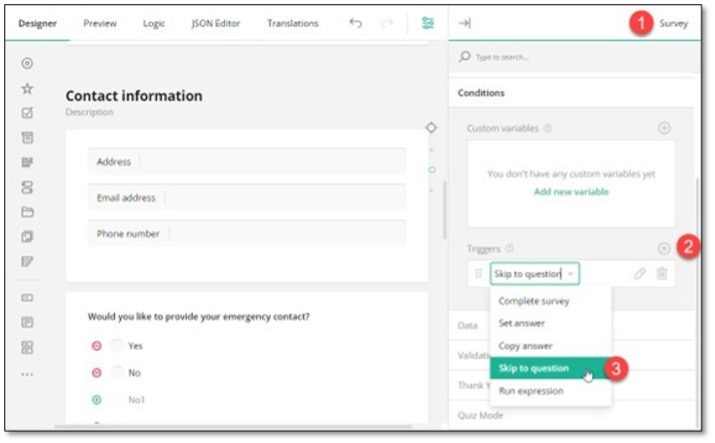
- In the top right corner of the Property Grid, select Survey to switch to the survey-level settings.
- Under Conditions, locate a subsection called Triggers and click the Plus icon to add a new trigger.
- In the trigger drop-down menu, select Skip to question.
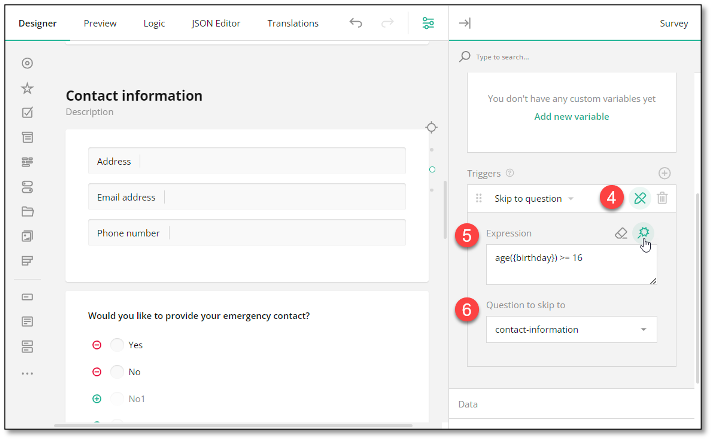
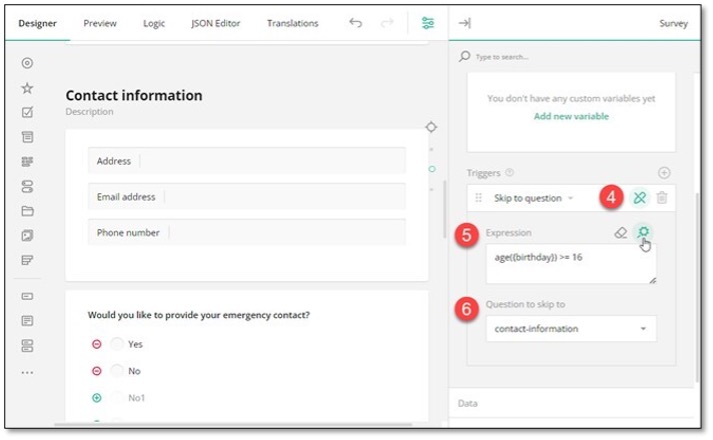
- Click the Pen icon to expand the trigger settings.
- Use one of the following ways to specify an expression that, when evaluates to true, will take a respondent to the target question (the destination you want to direct a respondent to).
- Enter the expression in the Expression field.
- Click the Magic wand icon to open a popup and build the expression using a GUI. Click Apply when you finish.
- Select a target question using the drop-down menu of the Question to skip to property.
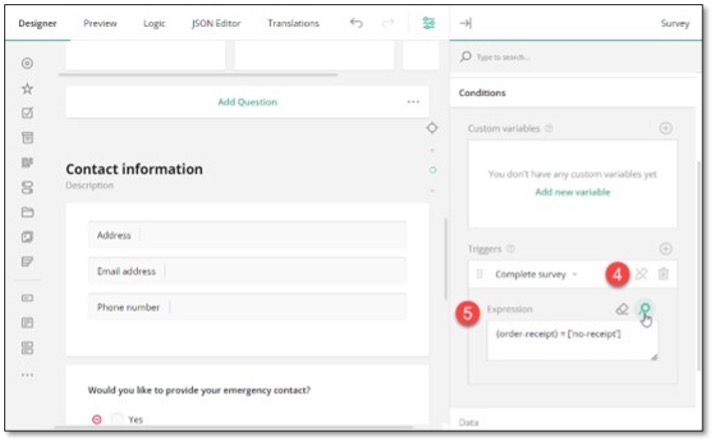
Complete Survey
To automatically complete a survey based on a user response, follow the steps below:
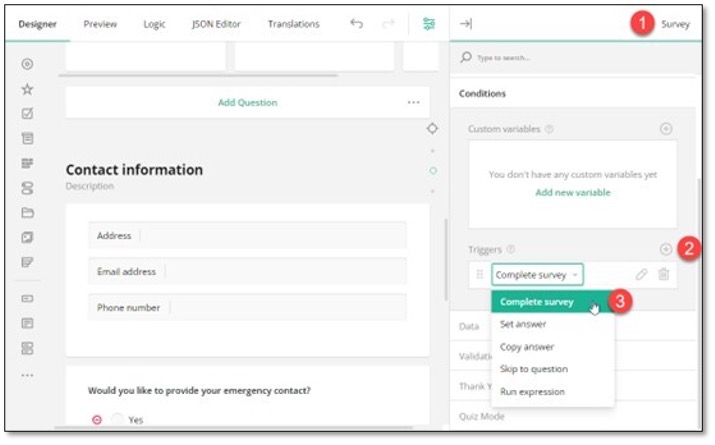
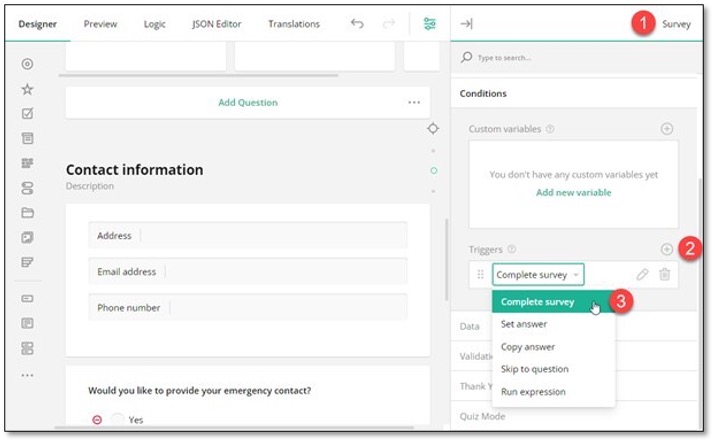
- In the top right corner of the Property Grid, select Survey to switch to the survey-level settings.
- Under Conditions, locate a subsection called Triggers and click the Plus icon to add a new trigger.
- In the trigger drop-down menu, select Complete survey.
- Click the Pen icon to expand the trigger settings.
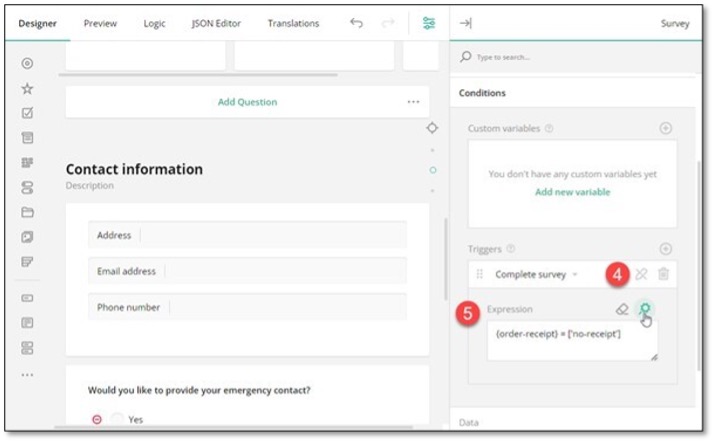
- Use one of the following ways to specify an expression that, when evaluates to true, will activate survey completion.
- Enter the expression in the Expression field.
- Click the Magic wand icon to open a popup and build the expression using a GUI. Click Apply when you finish.
Display Logic
Display logic, also known as conditional logic, is a feature that allows you to dynamically show or hide certain form fields or sections based on predefined conditions. Instead of displaying all questions or options at once, display logic enables the form content to adapt in real-time according to the user's input and show only relevant information. This makes the form more user-friendly and ensures that users can complete it more efficiently.
An Overview on How it Functions
Every element you add to your Survey Builder form is automatically assigned an ID. This ID is not visible to respondents and is used in various form configurations, including display logic setup. By using element IDs, you can configure display logic on any form page, section, input field, or choice option.
Question ID
You can change the question ID in the General settings of a question by entering a new value in the Question name property.

Similar properties are used to set an ID for a page or panel (a container element that allows you to group and manage several questions together): Page name and Panel name.
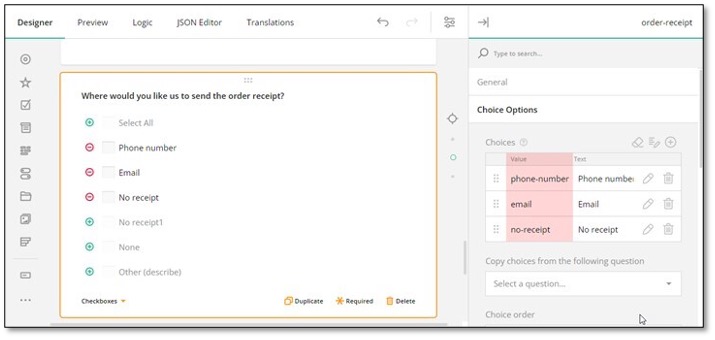
Choice Option ID
Choice options in single- and multi-select questions (Radio Button Group, Dropdown, Ranking, etc.) use the Value property to specify option IDs. To update the default choice option ID, select the question, and under Choice Options, enter a new ID in the left column. The right column values serve as display values that are visible to respondents.
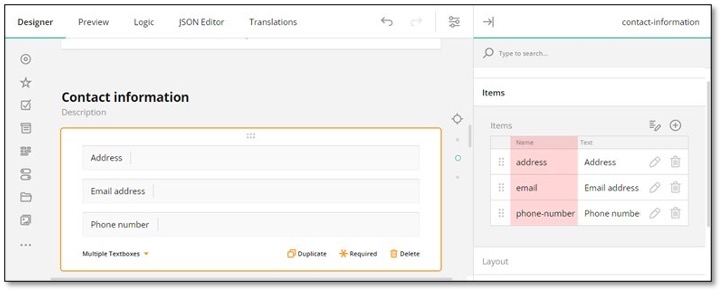
Item ID
Certain multiple entry questions, such as Multiple Textboxes, use items instead of choice options. In order to manage the visibility of individual items or use them as trigger elements, item IDs are used. To change a default item ID, select the question, locate the Items table, and enter a new item ID in the Name/Value column on the left.
If you want to manually enter conditional rules and expressions that define display logic, make sure to use curly brackets for referencing the question ID whose value you want to access and use as a trigger element, e.g., {nationality} = ‘United States’, where nationality is a trigger question ID. Similarly, by appending a path to the value, you can access and use as a trigger a specific question item: {contact-details. email} notempty, where contact-details is a question ID to which an item belongs and email is the ID of the item itself. Otherwise, use the graphical user interface (GUI) described below to set up your display logic without manual entry.
Types of Display Logic
Conditional Visibility
Conditional visibility determines whether an input field, choice option, section, or the entire page of your form is displayed to the user based on specified conditions. For instance, in an online shopping checkout form, additional shipping address fields might only become visible if the user selects a different shipping address from their billing address.
Conditional Read-Only Mode
Conditional read-only mode logic controls whether a survey element is editable or in read-only state based on certain conditions. For example, in a survey form asking about age, the field for "Parent Name" might only be editable if the respondent indicates they are under a certain age.
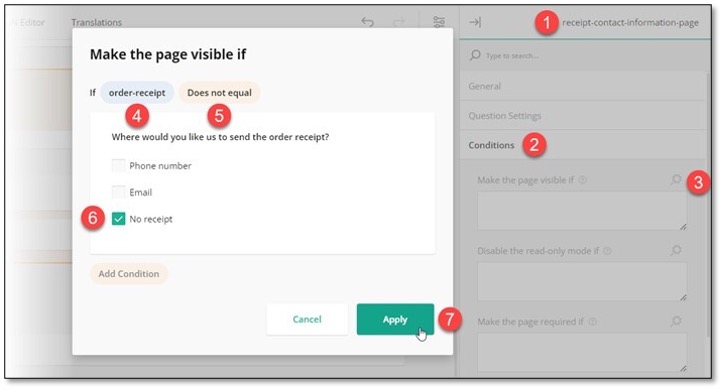
Page Display Logic
Page display logic is used to dynamically control the visibility and read-only state of form pages based on predefined conditions that include user input. To set up a display logic on a page, follow these steps:
- Select the page for which you want to create a conditional rule.
- Under the Conditions category, locate the Make the page visible if (if you want to conditionally hide the page) or Disable the read-only mode if property (if you want to conditionally restrict page editing).
- Click the Magic wand icon on the right of the property you want to configure. This action opens a popup with a GUI for setting up display logic.
- In the popup, select the trigger element ID.
- Select a condition from the drop-down menu: Empty, Not Empty, Equals, Does not equal, Any of, Greater than, Less than, Greater than or equals to, or Less than or equals to.
- Type in or select the triggering answer.
- Click Apply.
Section Display Logic
In the Survey Builder Form, a section of a form is referred to as a panel. It functions as a container that can be populated with various input fields and other panels to easily manage all nested elements at once. To set up a display logic on a panel, follow these steps:
- Select the panel for which you want to create a conditional rule.
- Under the Conditions category, locate the Make the panel visible if (if you want to conditionally hide the panel) or Disable the read-only mode if property (if you want to conditionally restrict panel editing).
- Click the Magic wand icon on the right of the property you want to configure. This action opens a popup with a GUI for setting up display logic.
- In the popup, select a trigger element ID.
- Select a condition from the drop-down menu: Empty, Not Empty, Equals, Does not equal, Any of, Greater than, Less than, Greater than or equals to, or Less than or equals to.
- Type in or select the triggering answer.
- Click Apply.

Question Display Logic
Question display logic allows you to dynamically manage the visibility and read-only state of form questions based on predefined conditions. To configure a display logic for a question, follow the steps below:
- Select the question or input field for which you want to create a conditional rule.
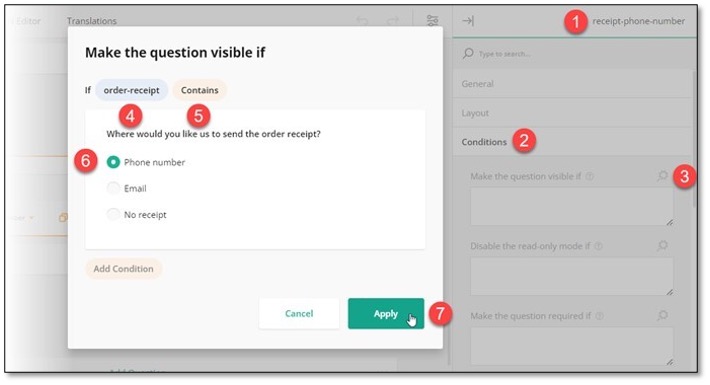
- Under the Conditions category, locate the Make the question visible if (if you want to conditionally hide the question) or Disable the read-only mode if property (if you want to conditionally restrict question editing).
- Click the Magic wand icon on the right of the property you want to configure. This action opens a popup with a GUI for setting up display logic.
- In the popup, select a trigger element ID.
- Select a condition from the drop-down menu: Empty, Not Empty, Equals, Does not equal, Any of, Greater than, Less than, Greater than or equals to, or Less than or equals to.
- Type in or select the triggering answer.
- Click Apply.

Choice Option Display Logic
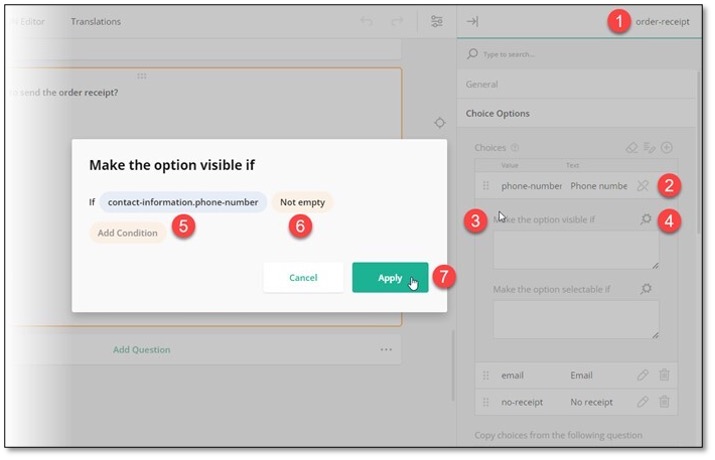
Choice option display logic is used to determine the visibility and read-only state of specific options within a multiple-choice question based on a predefined condition. To set up a display logic on a choice option, do the following:
- Select a question to which a dependent choice option belongs to.
- Under the Choice Options category, locate the dependent choice option and click the Pen icon to expand its individual settings.
- Locate the Make the option visible if (if you want to conditionally hide the option) or Make the option selectable if property (if you want to conditionally disable the option).
- Click the Magic wand icon on the right of the property you want to configure. This action opens a popup with a GUI for setting up display logic.
- In the popup, select a trigger element ID.
- Select a condition from the drop-down menu: Empty, Not Empty, Equals, Does not equal, Any of, Greater than, Less than, Greater than or equals to, or Less than or equals to.
- Type in or select the triggering answer and click Apply.
In the example below, the trigger element ID is contact-information.phone-number, where contact-information is the ID of the Multiple Textboxes question and phone-number is the ID of its item. The condition specifies that the item should not be empty, which means a user must provide an answer to this item.
Edit and Remove Display Logic in the GUI
Survey Builder Form features a Conditions section in the Property Grid for all form elements and a dedicated Logic module. This flexibility allows users with varying technical expertise to easily set up display logic on any form element through a GUI. The Logic module consolidates all conditional rules created in individual Conditions sections of the Property Grid. Through the Logic module, you can quickly access and edit existing rules in one centralized location without the need to navigate to specific form elements.
To remove a conditional rule, follow these steps:
- Navigate to the Logic module.
- Locate the conditional rule you want to remove and click the Bin icon that appears as you hover over the rule.
The default settings of the form builder do not offer a confirmation message upon deletion. The deleted conditional rule cannot be restored.
To edit a conditional rule, do the following:
- Navigate to the Logic module.
- Locate the conditional rule you want to edit and click the Expand icon that appears as you hover over the rule.
- Make necessary adjustments.
- Click Done to save changes.
If you're managing complex conditional rules, you can input them manually. To activate manual entry mode, expand a logic rule and click Manual Entry in the top right corner of the Logic module.

Branching Logic
Branching logic, also known as branch logic or form branching, refers to the practice of designing forms that allows you to direct respondents along different conditional paths based on their responses to preceding questions. With branching logic in place, your form can automatically skip irrelevant questions, reveal or hide certain sections, or even prompt a respondent to the survey completion page.
This dynamic approach enables forms to adapt to individual inputs and ensures that respondents are presented with only the most relevant content, thereby increasing completion rates and data accuracy. For example, consider a customer satisfaction survey for a software product. If a respondent indicates that they are satisfied with the product's performance, branching logic might direct them to a follow-up question asking for additional feedback. However, if the respondent expresses dissatisfaction, the logic might skip the follow-up question and instead prompt them to indicate specific areas of improvement.
Types of Branching Logic
Skip Logic
Skip logic is a form of branching that allows respondents to skip certain questions or sections based on their responses to previous questions. For instance, if a respondent indicates they do not own a car, skip logic might bypass questions related to car ownership and proceed to the next relevant section.
Show/Hide Logic
Show/hide logic, also known as display logic, involves revealing or concealing specific questions or sections based on predefined conditions. For example, if a respondent selects “Yes” to a question about owning a pet, show/hide logic might display additional questions related to pet ownership while hiding them if the respondent selects “No”.
Complete Survey Logic
In more complex scenarios, branching logic can direct respondents to the “Thank You” page based on how they responded to a trigger question. For example, if a respondent answers “Yes” to a question about experiencing a particular issue, they might be directed to a follow-up section with more detailed questions about that issue. On the other hand, if they answer “No”, they might be directed to the survey completion page because all further questions are not relevant to them due to the absence of any encountered issue.
How to Set Up Branching Logic
Skip to Question
To guide a respondent to a specific question further down the line based on their response to a current question, you can implement an expression-based event called "trigger". When the expression evaluates to true, the trigger initiates an action. One such trigger type is "Skip to question". It takes a respondent to a target question. To set up branching logic that redirects a respondent to a specific form question, follow these steps:
- In the top right corner of the Property Grid, select Survey to switch to the survey-level settings.
- Under Conditions, locate a subsection called Triggers and click the Plus icon to add a new trigger.
- In the trigger drop-down menu, select Skip to question.
- Click the Pen icon to expand the trigger settings.
- Use one of the following ways to specify an expression that, when evaluates to true, will take a respondent to the target question (the destination you want to direct a respondent to).
- Enter the expression in the Expression field.
- Click the Magic wand icon to open a popup and build the expression using a GUI. Click Apply when you finish.
- Select a target question using the drop-down menu of the Question to skip to property.
Show/Hide Questions
The simplest way to incorporate branching logic in a form is by displaying certain questions to some of your respondents while hiding them from others based on their answers. This approach is particularly convenient when you need to target specific form elements. With Survey Builder, you can set up display logic on individual questions, sections (in Survey Builder referred to as "panels"), or the entire page. To create a conditional rule that determines the visibility of a question, panel, or page, do the following:
- Select the dependent element you want to dynamically hide.
- Expand its Conditions category in the Property Grid and locate the Make the question/panel/page visible if property.
- Click the Magic wand icon on the right of the property. This action opens a popup with a GUI for setting up display logic.
- In the popup, select the trigger element ID (its Question name property value).
- Select a condition from the drop-down menu: Empty, Not Empty, Equals, Does not equal, Any of, Greater than, Less than, Greater than or equals to, or Less than or equals to.
- Type in or select the triggering answer.
- Click Apply.
Complete Survey
To automatically complete a survey based on a user response, perform the following steps:
- In the top right corner of the Property Grid, select Survey to switch to the survey-level settings.
- Under Conditions, locate a subsection called Triggers and click the Plus icon to add a new trigger.
- In the trigger drop-down menu, select Complete survey.
- Click the Pen icon to expand the trigger settings.
- Use one of the following ways to specify an expression that, when evaluates to true, will activate survey completion.
- Enter the expression in the Expression field.
- Click the Magic wand icon to open a popup and build the expression using a GUI. Click Apply when you finish.
Survey Logic
Custom Variable using Contact List as a Skip Pattern
Custom Variables in a survey with a Contact List as a Skip Pattern is to create a more dynamic and personalized survey experience for respondents. Custom Variables allow you to associate specific data points, such as respondent name, location, or preferred language, with each respondent in your Contact List.
When the survey is distributed, these variables are automatically passed to the survey and can be used to control the flow of questions through skip patterns. This approach streamlines the respondent experience by ensuring survey respondents are only shown questions relevant to their profile, which reduces survey fatigue and improves completion rates.
Additionally, using Custom Variables enables targeted data collection and segmentation, allowing survey administrators to analyze feedback more effectively across different respondent groups. By leveraging skip patterns based on these variables, organizations can tailor surveys to diverse audiences while maintaining a single unified survey structure.
How to Set Up
Start by checking your prepared Contact List and take note of all available variable

Set Up Custom Variables in the Survey
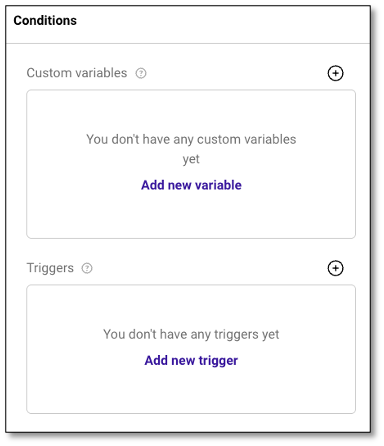
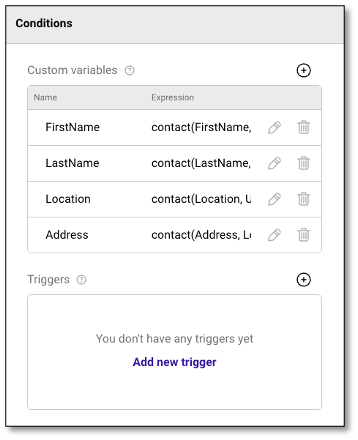
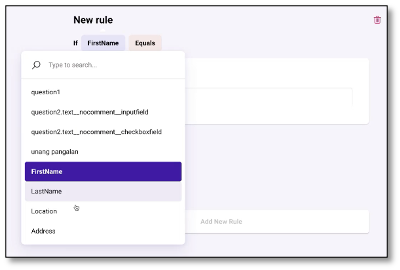
- Create a new survey. Navigate to the Conditions section and click the plus (+) icon to add a new condition under Custom Variable.
- Under Name, type ‘FirstName’
- In the Expression field, enter ‘contact(FirstName, Kim)’ assign a fallback value. This serves as a reference to pull data from your Contact List during the survey.
Insert Variables in Questions
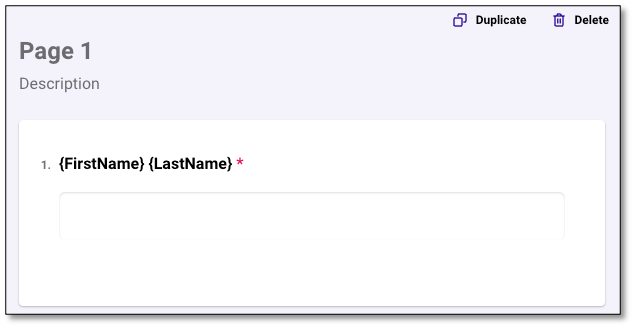
- Go to the question page and use curly brackets to reference the variable, e.g., {FirstName} {LastName}.
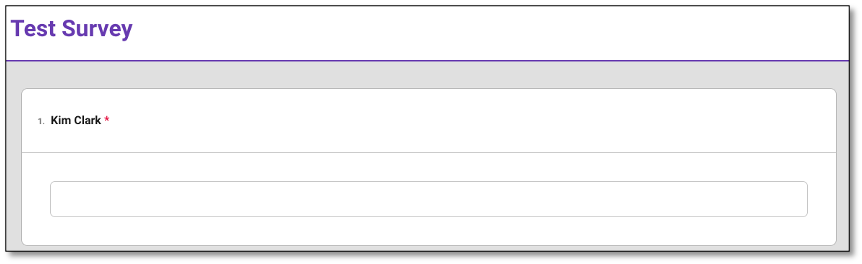
- Validate the setup in the Preview module to ensure the first name and last name reflect the fallback values correctly.
- Define more variables as needed.
- Return to the question page and add a question that uses these variables.
NOTE: Curly bracket, also known as a brace, is a type of punctuation used in computer programming. It serves as an extension to an existing code or program to provide additional functions and assistance.
Preview Mode
Configure Skip Logic
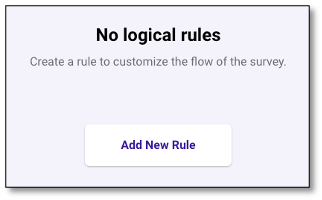
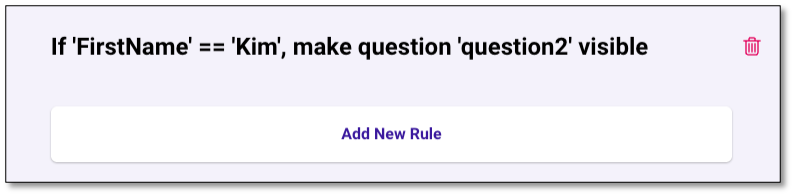
- Open the Logic module and click the Add New Rule button.
-
Enter new rule.
-
Select the trigger by adding the first variable, then type the fallback value on the space provided
-
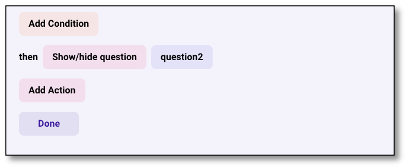
Under Select Action, choose Show/Hide Question, then configure the logic to show or hide specific questions based on the variable values.
-
Select the trigger answer, then click Done to save the rule.
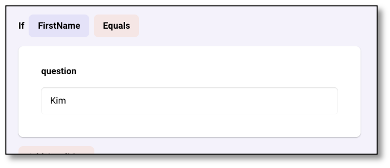
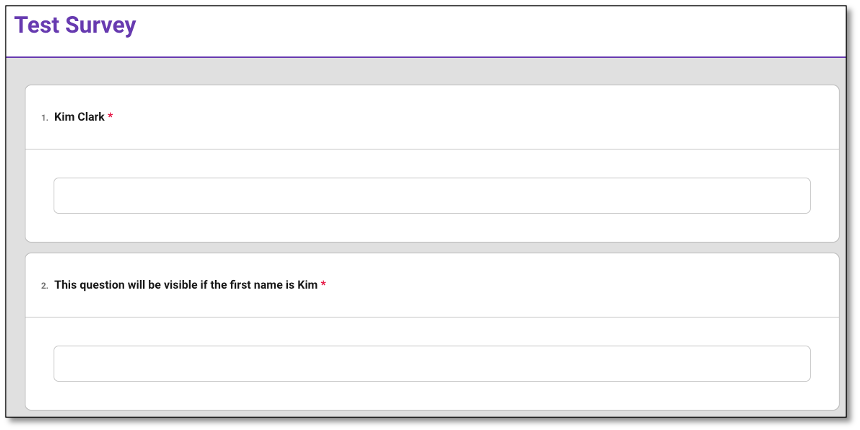
For this example, we set up a question that appears only if the FirstName equals ‘Kim.
-
- Go to the Preview module to verify if the questions appear or are hidden according to your conditions.
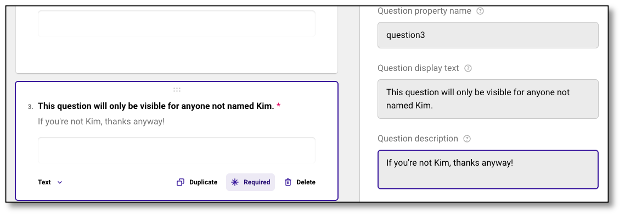
Enhance Question Descriptions & Add More Rules under Logic module
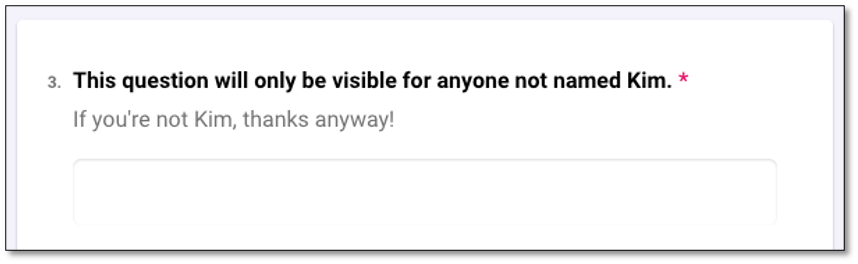
- Navigate to the General section and populate the Question Description field for additional context.
- Go back to the Logic module to create additional rules, as needed.
- Test and validate each logic flow in the Preview module to confirm accuracy.
Prepare for Distribution and Final Validation
- Create a distribution campaign for your survey.
- Upload your Contact List file under the Recipients tab and send out the survey for distribution.
- Under the Compose a Message tab, use the @ symbol to let you insert dynamic fields such as the First Name, Last Name and the Survey Link. The @ functionality pulls in the fields from the Contact list under the Recipients tab.
- Proceed to Summary tab to review your work, then click the Send button
- Upon receipt of the survey invitation, access the survey as a respondent and confirm that all custom variables and logic rules work as intended.
Managing Data Transfer
This section explores how to seamlessly move data within your survey. Learn how to carry forward responses, pipe selected choices into a dynamic matrix, and sync data across fields using a Join Identifier to ensure a cohesive and personalized survey experience.
How to Carry Forward Responses
Carry Forward is a survey technique that takes selected responses from one question and copies them to a subsequent question. This method ensures that follow-up questions are directly relevant to the respondent’s previous answers. You can use the feature for follow-up questions that require only the items selected from a previous question or, conversely, only the items that were not selected.
Supported Question Types
Any multi-select question type from the list below can be used as both a source and a target question:
- Checkboxes
- Dropdown
- Multi-Select Dropdown
- Radio Button Group
- Ranking
Types of Choices to Carry Forward
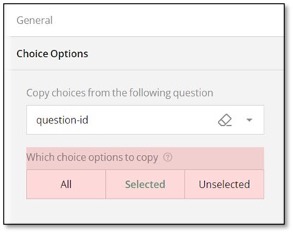
The Which choice options to copy property allows you to select what choices of a source question you want to use in the follow-up question:
- All - Copies all choice options from the selected source question.
- Selected - Dynamically copies only selected choice options.
- Unselected - Dynamically copies only unselected choice options.
The None and Other choice options are passed by default if enabled in the source question.
Limitations
When choosing the source and target question types for Carry Forward, take into account the following factors:
- Radio Button Group and Dropdown questions do not support multiple selections; they can pass only one selected choice. For this reason, it's recommended to use them as source questions only if unselected or all choices are required for the follow-up question.
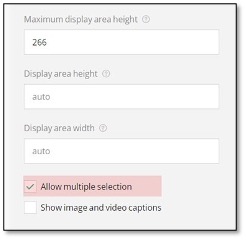
- Image question passes selected, unselected, or all image/video files if the follow-up question is also an Image / Image Uploader type. Otherwise, it passes image/video captions. You can change the selection type—single or multiple—by using the Allow multiple selection checkbox.
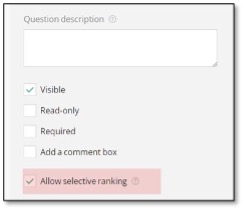
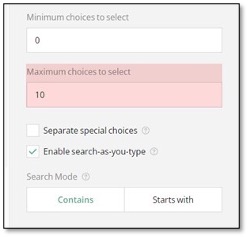
- A Ranking question can be used as a source of all choices only, unless the Allow selective ranking property checkbox is selected.
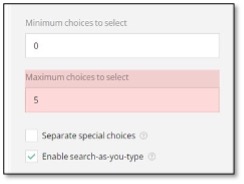
- Checkboxes and Multi-Select Dropdown can pass one or multiple selected choices, depending on the value set for the Maximum choices to select property.
Examples
Carry Forward Selected Responses from a Multi-Select Dropdown to a Dropdown
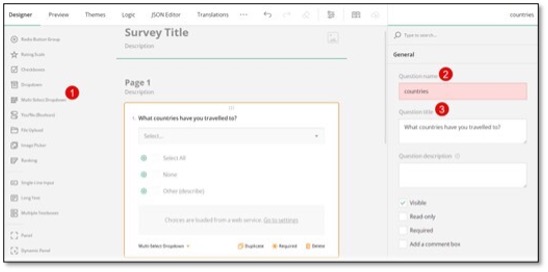
- Add a Multi-Select Dropdown question to the design surface.
- Assign it a Question name (ID) and a user-friendly Question title.
- Under Choice Options, populate the Multi-Select Dropdown with choices.
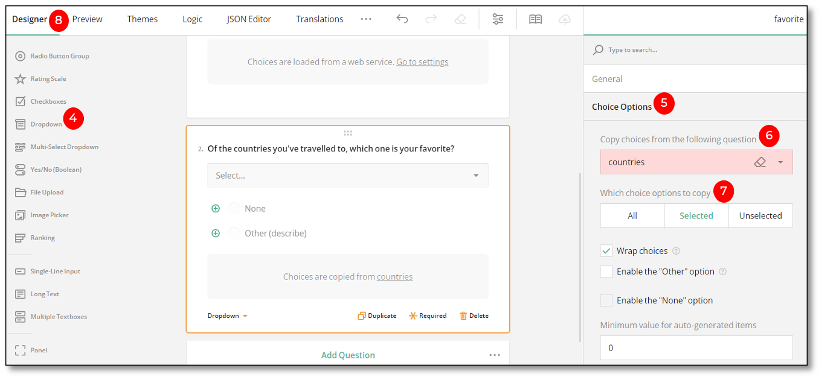
- Add a Dropdown question to the design surface.
- Under Choice Options, locate the Copy choices from the following question setting.
- Select a source question ID (Question name value) from the drop-down list of available questions.
- Locate the Which choice options to copy setting and click Selected.
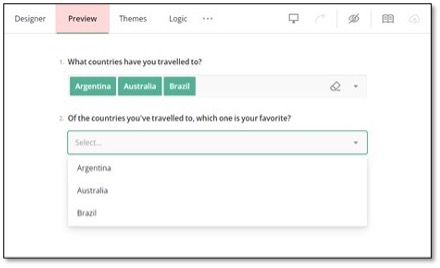
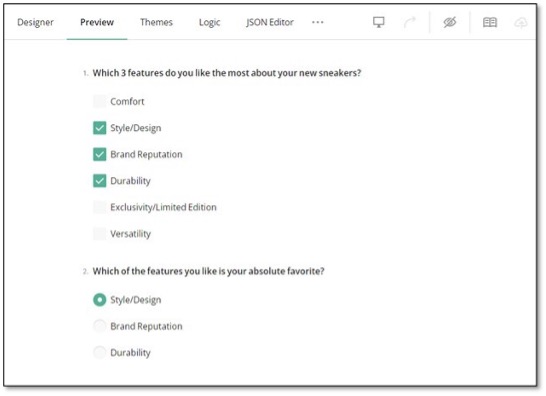
- Switch to the Preview module to test the configuration.
Carry Forward Selected Responses from Checkboxes to a Radio Button Group
- Add a Checkboxes question to the design surface.
- Assign it a Question name (ID) and a user-friendly Question title.
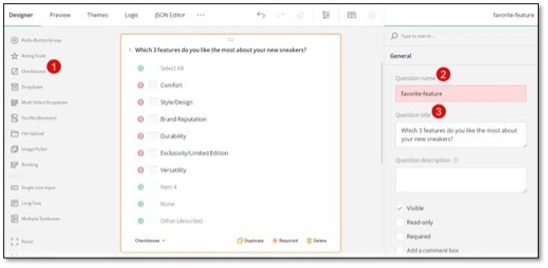
- Under Choice Options, populate the Checkboxes question with choices.
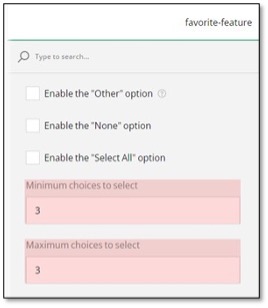
- To restrict the number of items a respondent can select, under Choice Options, locate the Minimum choices to select and Maximum choices to select settings and enter the required values.
- Add a Radio Button Group question to the design surface.
- Under Choice Options, locate the Copy choices from the following question setting
- Select a source question ID (Question name value) from the drop-down list of available questions.
- Locate the Which choice options to copy setting and click Selected.
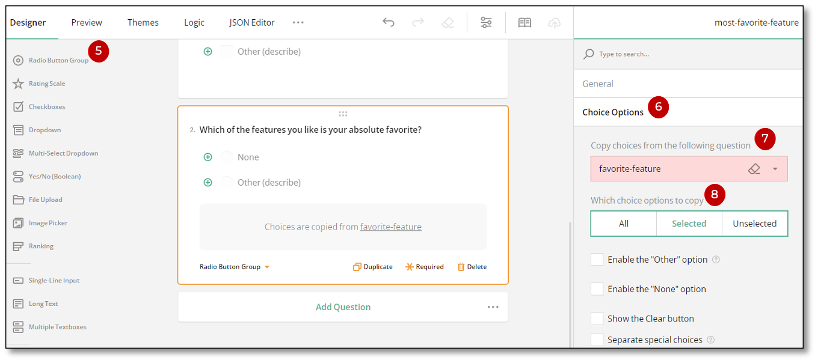
- Switch to the Preview module to test the configuration.
Carry Forward Unselected Responses Between Radio Button Groups
- Add a Radio Button Group question to the design surface. Assign it a Question name (ID) and a user-friendly Question title.
- Under Choice Options, populate the Radio Button Group with choices. Add another Radio Button Group question to the design surface.
- Under Choice Options, locate the Copy choices from the following question setting and select a source question ID (Question name value) from the drop-down list of available questions.
- Locate the Which choice options to copy setting and click Unselected.
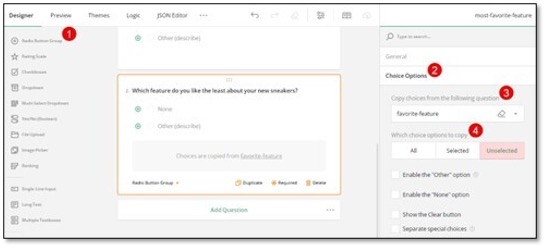
- Switch to the Preview module to test the configuration.

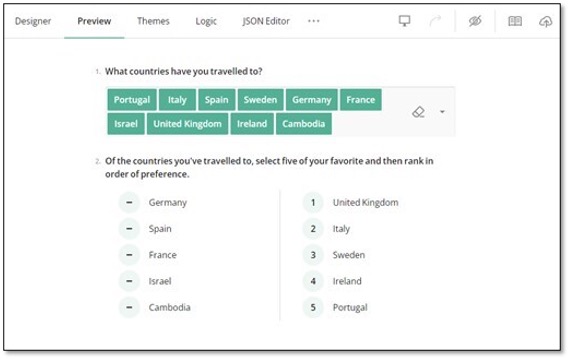
Carry Forward Selected Responses from a Multi-Select Dropdown to a Ranking Question
- Add a Multi-Select Dropdown question to the design surface.
- Assign it a Question name (ID) and a user-friendly Question title.
- Under Choice Options, populate the Multi-Select Dropdown with choices.
- Optionally, specify the Choice Options > Maximum choices to select setting to limit the number of choices a respondent can select.
- Add a Ranking question to the design surface.
- Under General, select the Allow selective ranking checkbox.
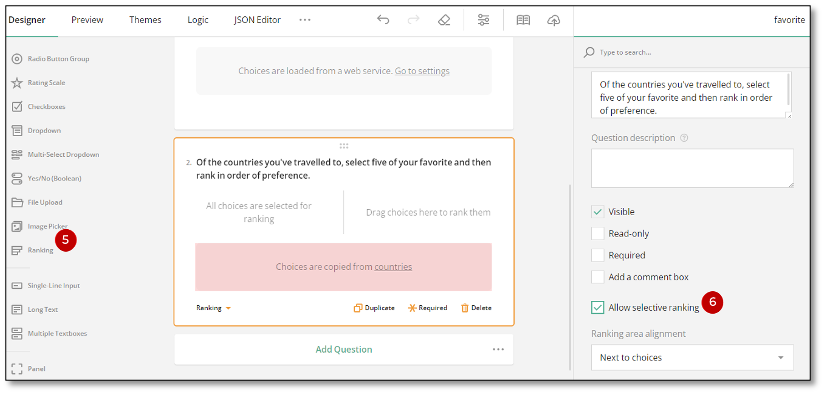
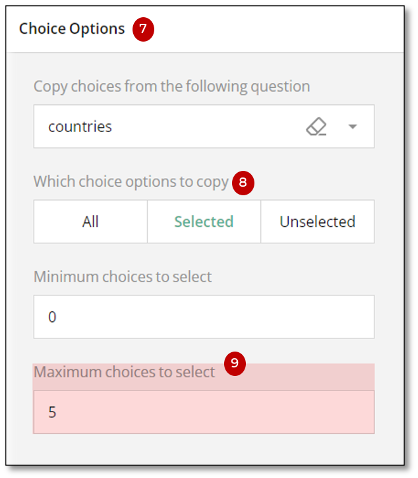
- Under Choice Options, locate the Copy choices from the following question setting and select a source question ID (Question name value) from the drop-down list of available questions.
- Locate the Which choice options to copy setting and click Selected.
- Set a required value in the Maximum choices to select input field.
- Switch to the Preview module to test the configuration.
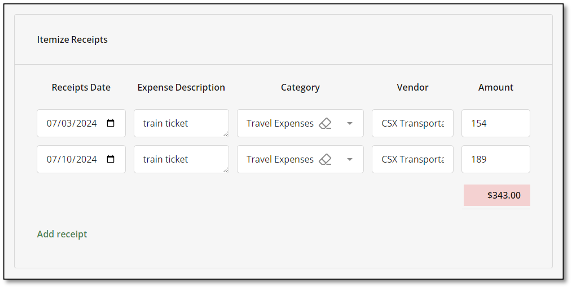
How to Pipe Selected Choices to a Dynamic Matrix
About Text Piping
Text piping is a feature used in forms and surveys to dynamically insert (or "pipe") specific information entered or selected by a user into subsequent questions, text fields, or the "Thank You" page. This allows you to create personalized and context-sensitive content and improve overall user experience by making the form or survey feel more tailored to the individual's responses.
This guide shows how to pipe selected choice options of a multi-select question to rows of a Dynamic Matrix.
Supported Source Question Types
You can use Checkboxes or Multi-Select Dropdown as a question that provides choice options to the rows of a Dynamic Matrix. In the instructions below, we will be using a Checkboxes question. The same steps apply to a Multi-Select Dropdown as well.
Configurations
In order to pipe selected choices to a Dynamic Matrix, follow these steps:
- Add a Checkboxes question to the design surface.
- Under General, assign a Question name and a user-friendly Question title to it.
- Under Choice Options, populate the question with Choices.
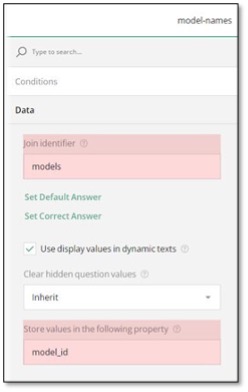
- Under Data, locate the Join identifier property and assign any unique value to it.
- Locate the Store values in the following property field and enter another unique value into it.
- Add a Dynamic Matrix to the design surface.
- Under Conditions, locate the Make the question visible if property to make the matrix visible only when at least one checkbox of the source question is selected.
- Click the Magic wand icon on the right of the property. This action opens a popup with a GUI for setting up display logic.
- In the popup, select the source question ID (its "Question name" property value you assigned in step 2).
- Select the Not Empty condition from the drop-down menu and click Apply.
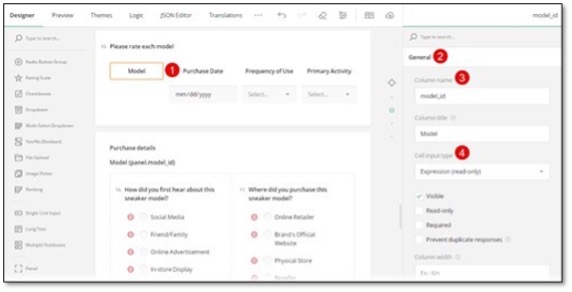
- Under Data, locate the Join identifier property and set it to the same value you have used for this property of the Checkboxes question in step 4.
- Select the column of the matrix to which you want to pipe selected choices. This action will display the settings of the column.
- Under General, locate the Column name field and enter the value you used for the Store values in the following property field of the Checkboxes question in step 5.
- Set the Cell input type to Expression (read-only).
- Configure the remaining columns of the matrix.
How to sync data within a form using a Join Identifier
At its core, the join identifier is a custom ID that can be assigned to several questions within a survey or form. This identifier acts as a key or data point to identify related questions, link them together, and synchronize a common value within a single object or merge related entries into an array of objects.
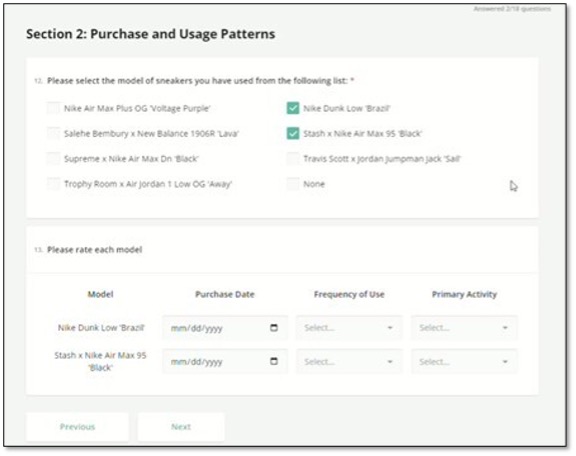
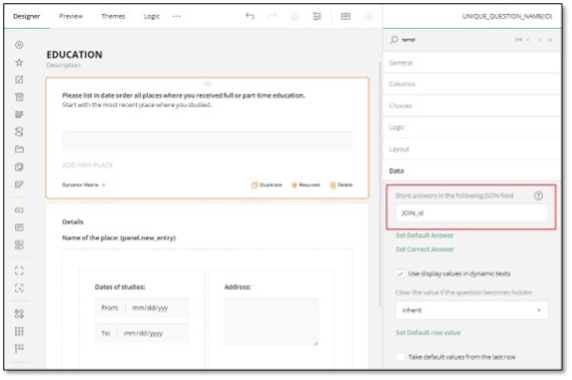
For instance, you can use this functionality to enable respondents to list places of education as a part of an application process. Once a new place is added to the list, this entry can be used as a header of a panel that contains further details of the place, such as address and dates of attendance as shown in the image below. The panel and details-related questions within it form a panel template. Each new entry initiates the creation of a new duplicate of this panel template titled as the referenced entry.

How it Functions
The join identifier is configured using the valueName property for each question you want to link. Unlike the name property, which needs to be unique for every question in a form, the valueName property is shared across all the questions and panels you are linking. This ensures that data from these linked questions can be treated as part of the same group. The valueName can be specified in a designated field within the Property Grid of the Survey Builder UI, as shown in the following image.
This setup allows multiple questions to share the same identifier, making it easier to track and analyze responses from related questions across the survey.
Expression Syntax
About Expressions and Expression Syntax Rules
An expression is a mathematical formula or logical statement used to specify conditional rules or calculate values. With expressions, you can control the flow of your survey, manage question visibility and read-only state, perform in-survey computations, and more. Expressions are evaluated (that is, calculated to produce a result) in real time while a respondent fills out a form. This dynamic evaluation ensures that expression results are always up-to-date.
DIY Survey Builder provides a graphical user interface for constructing logical expressions—a pop-up dialog with a list of questions and custom variables to select from and available operators. This dialog appears when you click a Magic wand button next to an expression setting in the Property Grid. For example, you can find such settings within the Conditions category of a page or question.
Although the visual expression builder covers most use cases, it operates within certain limitations that do not allow you to construct any imaginable expression. To unlock the full capabilities of expressions, you need to get acquainted with the syntax rules. This guide will introduce you to expression structure, supported operators, and built-in functions that you can use for calculations within your form.
Expression Operands
Any expression consists of operands and operators. Operands are values upon which an operator performs an action. Alongside literals (values like 3, true, or "selected"), expressions can use question values, custom variables, and function results as operands.
Question Values
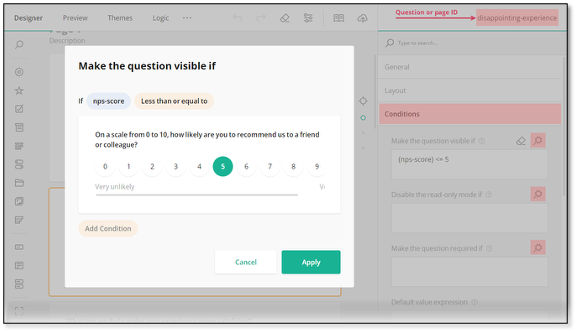
To use a question value in an expression, specify the Question name property value in curly brackets: {my-question-name}. Upon expression evaluation, the question name will be replaced with a real value. For example, the image below shows two questions with names nps-score and promoter-features. The latter question is displayed only when the nps-score value is 9 or higher. To configure this behavior, you need to do the following:
- Select the promoter-features question on the design surface or in the survey tree.
- Open the Conditions category and find the Make the question visible if setting in it.
- Specify this setting with the following expression: {nps-score} >= 9.

NOTE: For questions with a specified Data > Join identifier setting, use its value instead of the Question name value.
Complex question types (Multiple Textboxes, Dynamic Panel, matrices) and multi-select questions (Checkboxes, Image Picker, Ranking) support advanced syntax for accessing the values of their inner elements (individual textboxes, items, panels, rows, columns).
The advanced syntax may be useful in many cases, one of which is data validation in a Dynamic Panel. For instance, if the Dynamic Panel contains Start Date and End Date questions, you might want to check that the start date doesn't exceed the end date. To set up this configuration, follow these steps:
- Add a Dynamic Panel to the design surface.
- Add two Single-Line Input questions to the Dynamic Panel.
- Select the first question, locate the Input type drop-down menu under the General category, and select Date.
- Repeat step 3 for the second question.
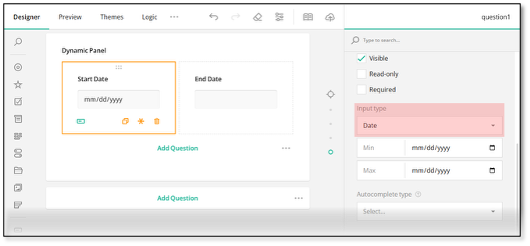
- Select the first question and enter start-date as the Question name setting value.
- Select the second question and enter end-date as a value for the same setting.
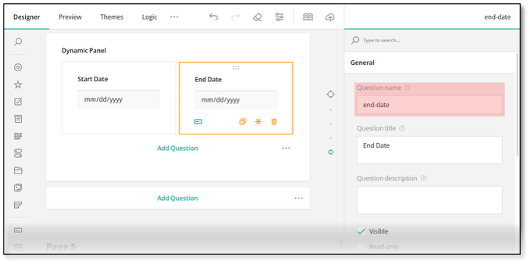
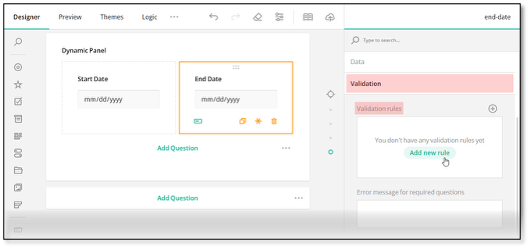
- Select the end-date question, locate the Validation rules setting under the Validation category, and click Add new rule.
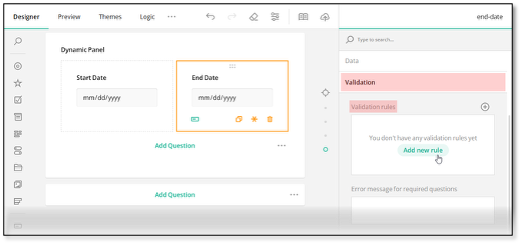
- Specify the following Error message: End date should be greater than start date.
- Enter the following Validation expression: {panel.start-date} < {panel.end-date}.
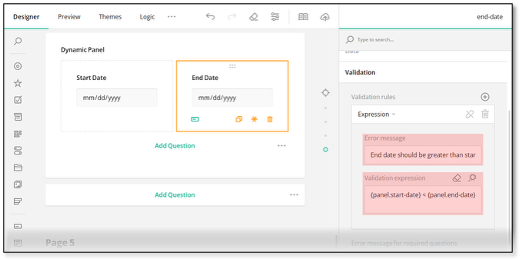
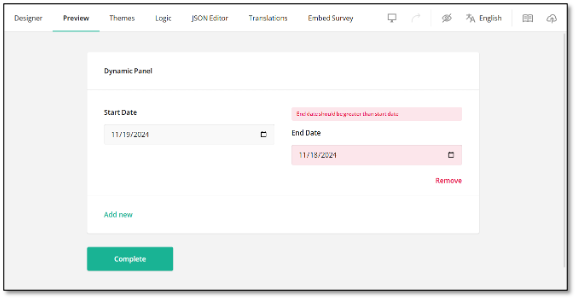
To check that the validation rule works as expected, open the Preview tab, add a new entry to the Dynamic Panel, and select invalid start and end dates.
Custom Variables
Custom variables are user-defined variables used to store dynamically calculated values. To use a custom variable in an expression, wrap its name in curly brackets, just like you do with question names: {my-custom-variable}. For information on how to define custom variables, refer to the following help topic:
Function Results
Calculation functions produce results that can be used as operands in expressions. For example, the dateDiff() function computes a difference between two dates. The function's result can be used in a validation expression to ensure that the difference doesn't exceed a specified limit. Follow the instructions below to configure this behavior:
- Add two Single-Line Input questions to the design surface.
- Set their Input type to Date and Question name to start-date and end-date (perform steps 3 to 6 from the instructions for the Dynamic Panel).
- Select the end-date question, locate the Validation rules setting under the Validation category, and click Add new rule.
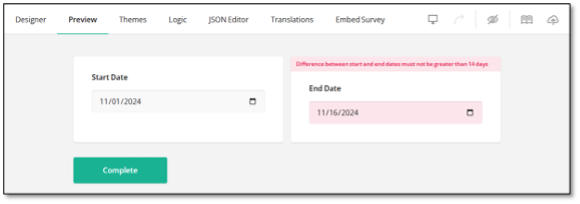
- Specify the following Error message: Difference between start and end dates must not be greater than 14 days.
- Enter the following Validation expression: dateDiff({start-date}, {end-date}, "days") <= 14.
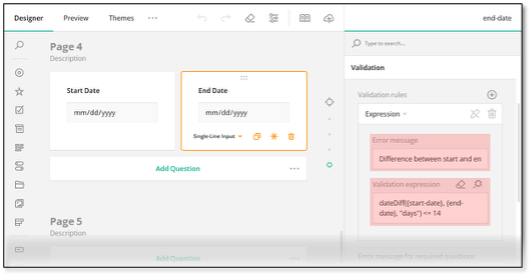
To verify the validation, open the Preview tab and select two dates that are more than 14 days apart.
Other calculation functions are used in expressions in a similar way. For more details, refer to the Calculation Functions section of this document.
Expression Operators
Operators are symbols or keywords that define operations performed on operands. DIY Survey Builder supports comparison, logical, and arithmetic operators.
Comparison Operators
Comparison operators are used to compare two values (or in case of empty and not empty, one value with undefined and null) and define whether the comparison is true or false. These operators are essential for managing the survey flow and implementing logic within your survey. The following table lists available comparison operators:
| Operator | Description | Expression example |
|---|---|---|
| empty | Returns true if the value is undefined or null. | "{q1} empty" |
| notempty | Returns true if the value is different from undefined and null. | "{q1} notempty" |
| <= / lessorequal | Compares two values and returns true if the first is less or equal to the second. | "{q1} <= 10" |
| >= / greaterorequal | Compares two values and returns true if the first is greater or equal to the second. | "{q1} >= 10" |
| = / == / equal | Compares two values and returns true if they are loosely equal (that is, their type is disregarded). | "{q1} = 10" |
| != / <> / notequal | Compares two values and returns true if they are not loosely equal. | "{q1} != 10" |
| < / less | Compares two values and returns true if the first is less than the second. | "{q1} < 10" |
| > / greater | Compares two values and returns true if the first is greater than the second. | "{q1} > 10" |
| *= / contains / contain | Compares two values and returns true if the first value contains the second value within it. | "{q1} contains 'abc'" |
| notcontains / notcontain | Compares two values and returns true if the first value doesn't contain the second value within it. | "{q1} notcontains 'abc'" |
| anyof | Compares a value with an array of values and returns true if the value is present in the array. | "{q1} anyof [ 'value1', 'value2', 'value3' ]" |
| allof | Compares two arrays and returns true if the first array includes all values from the second. | "{q1} allof [ 'value1', 'value2', 'value3' ]" |
Logical Operators
Logical operators combine or revert logical conditions to create complex logic for features like visibility, data validation, dynamic read-only state, etc. Available logical operators are described below:
| Operator | Description | Expression example |
|---|---|---|
| ! / negate | Returns true if the condition returns false, and vice versa. | "!{q1}" |
| && / and | Combines two or more conditions and returns true if all of them are true. | "{q1} empty and {q2} empty" |
| || / or | Combines two or more conditions and returns true if any of them is true. | "{q1} empty or {q2} empty" |
Arithmetic Operators
Arithmetic operators perform simple mathematical calculations on numeric values. You can find the available arithmetic operators in the following table:
| Operator | Description | Expression example |
|---|---|---|
| + | Adds up two values. | "{q1} + {q2}" |
| - | Subtracts the second value from the first. | "{q1} - {q2}" |
| * | Multiplies two values. | "{q1} * {q2}" |
| / | Divides the first value by the second. | "{q1} / {q2}" |
| % | Returns the remainder of the division of the first value by the second. | "{q1} % {q2}" |
| ^ / power | Raises the first value to the power of the second. | "{q1} ^ {q2}" |
Calculation Functions
Calculation functions allow you to perform computations within your survey. All functions are divided into three groups: logical, date, and aggregation functions.
Logical Functions
Expressions support one logical function—iif. It returns one value or the other based on whether a specified condition is true or false.
Example: "iif({question1} > 20, 'High', 'Low')"
Date Functions
For date calculations, you can use the following functions:
| Function | Return value | Example |
|---|---|---|
| ** age ** | Age according to a given birthdate. | "age('2000-01-01')" |
| currentDate | Current date and time. | "currentDate()" |
| today | Current date or a date shifted from the current by a given number of days. | "today(-1)" (yesterday) "today(1)" (tomorrow) |
| year | Year of a given date. | "year('2000-01-01')" (2000) |
| month | Month of a given date as a value from 1 (January) to 12 (December). | "month('2000-01-01')" (1) |
| day | Day of the month for a given date as a value from 1 to 31. | "day('2000-01-30')" (30) |
| weekday | Day of the week for a given date as a value from 0 (Sunday) to 6 (Saturday). | "weekday('2000-01-01')" (6) |
| dateDiff | Difference between two given dates in full days (default), hours, minutes, months, or years. | "dateDiff('2000-01-01', '2000-02-01', "days")" (31) "dateDiff('2000-01-01', '2000-04-01', "months")" (3) "dateDiff('2000-01-01', '2009-02-01', "years")" (9) "dateDiff('2000-01-01T01:00:00', '2000-01-01T03:00:00', "hours")" (2) "dateDiff('2000-01-01T01:00:00', '2000-01-01T01:45:00', "minutes")" (45) |
| dateAdd | A Date value with an added or subtracted number of full days (default), months, or years. | "dateAdd('2000-01-01', 10, "days")" (new Date(2000-01-11)) "dateAdd('2000-01-01', 4, "months")" (new Date(2000-05-01)) "dateAdd('2000-01-01', -5, "years")" (new Date(1995-01-01)) |
Aggregation Functions
Aggregation functions are used to summarize, combine, or otherwise process a set of values into a single value.
Most survey questions support basic aggregation functions, such as sum, min, max, and avg. For Multi-Select Matrix, Dynamic Matrix, and Dynamic Panel, you can use advanced functions that aggregate values in a specific matrix column or panel question. The advanced functions provide an optional third parameter that allows you to filter values included in the calculation.
The following table describes all aggregation functions that you can use in expressions:
| Function | Return value | Example |
|---|---|---|
| sum | Sum of passed numbers. | "sum(10, 20, 30, 40)" (100) |
| min | Minimum of passed numbers. | "min(10, 20, 30, 40)" (10) |
| max | Maximum of passed numbers. | "max(10, 20, 30, 40)" (40) |
| avg | Average of passed numbers. | "avg(10, 20, 30, 40)" (25) |
| sumInArray | Sum of numbers in a specific matrix column or panel question. | See below |
| minInArray | Minimum of numbers in a specific matrix column or panel question. | See below |
| maxInArray | Maximum of numbers in a specific matrix column or panel question. | See below |
| avgInArray | Average of numbers in a specific matrix column or panel question. | See below |
| countInArray | Number of matrix rows whose specified column is not empty or number of inner panels whose specified question is not empty. | See below |
How to Use Custom Variables in Form Calculations
About Custom Variables
Custom variables act as intermediate or auxiliary variables used in form calculations. They enable you to perform various calculations in the background and access the resulting expression value using a unique custom variable name (ID). This value can then be used in conditional logic to control the behavior and visibility of other questions within the form.
A common use case for a custom variable is to calculate a respondent's age based on the date entered in a "Date of birth" field and then show or hide certain questions depending on the age value. Alternatively, you can use the custom variable in a survey completion trigger that will direct the respondent to the "Thank You" page if their calculated age falls below a specified threshold.
How to Create a Visibility Rule Based on a Custom Variable Value
The steps below describe how to create a custom variable using the age() function and conditionally show a follow-up question depending on the calculated age value.
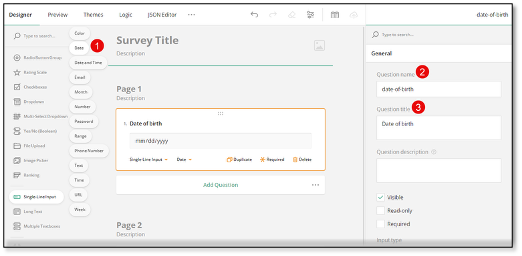
- In the Toolbox area, hover over Single-Line Input and select Date from the list of available input types.
- Enter a question ID in the Question name text box.
- Enter a user-friendly value in the Question title text box. This value will be visible to respondents.
- Switch to the survey-level settings in the top right corner.
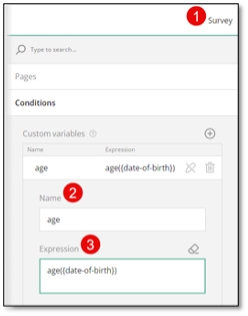
- Under Conditions, locate the Custom variables subsection.
- Click the Plus icon to create a new variable.
- Enter a unique Name for the variable.
- Enter the following sample value in the Expression field: age({date-of-birth}), where date-of-birth is the "Question name" value of the field in which a respondent enters their date of birth.
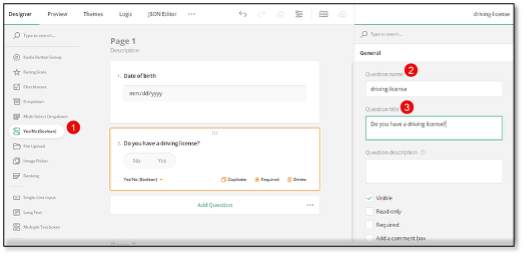
- Add a dependent question to your form. In this example we are using a Yes/No (Boolean) question.
- Enter a question ID in the Question name text box.
- Enter a user-friendly value in the Question title text box.
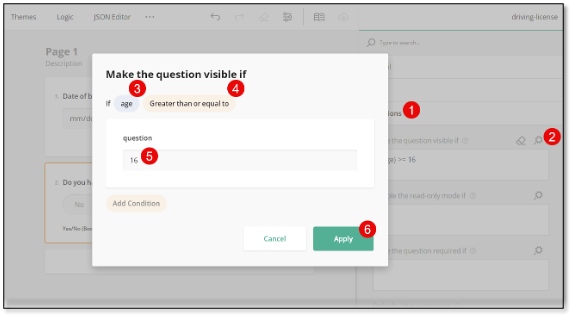
- Under Condition, locate the Make the question visible if property.
- Click the Magic wand icon on the right of the property to open a pop-up dialog.
- In the dialog, select the custom variable name assigned in step 7 and the condition that has to be met in order for the dependent question to be visible.
- Enter the desired threshold value and click Apply.
Based on the configuration above, the "Do you have a driving license?" question will only be visible if a respondent's age is greater than or equals to 16.
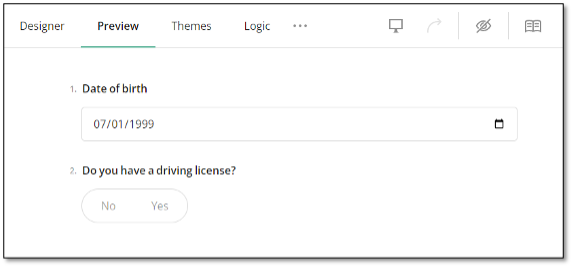
To test the custom variable configuration, switch to the Preview tab and select or enter a value in the Date of birth question.
How to Complete a Survey Based on a Custom Variable Value
The steps below describe how to create a trigger that will prompt a respondent to the "Thank you" page based on the age value calculated using a custom variable.
- Complete steps 1-8 from the previous section of the guide.
- Switch to the survey-level settings in the top right corner.
- Under Conditions, locate the Triggers subsection.
- Click the Plus icon to create a new trigger.
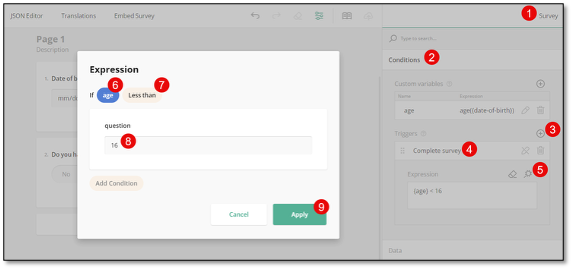
- Select Complete survey from the drop-down menu on the left.
- Click the Magic wand icon on the right of the Expression property to open a pop-up dialog.
- In the dialog, select the custom variable name and the condition that has to be met to trigger survey completion.
- Enter the desired threshold value and click Apply.
Based on the configuration above, the survey completes automatically if a respondent's age is less than 16.
How to Use Column Totals in Matrix Questions
About Data Aggregation in Matrix Columns
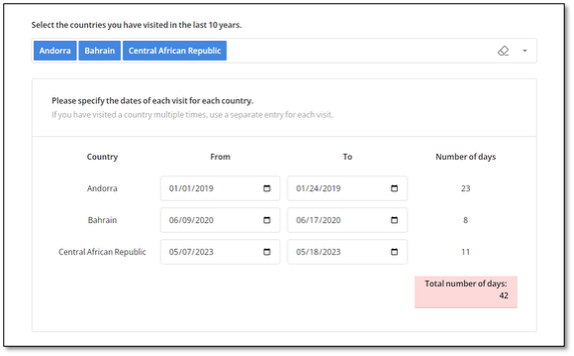
DIY Survey Builder allows you to combine data from different rows of a matrix column by using a set of properties under the Totals category. For example, if you have a matrix question that asks a user to specify dates of visit, you might aggregate the "Number of days" column to find the total number of days spent abroad, the average duration of a trip, or the maximum and minimum number of days spent away.
Supported Question Types
You can aggregate data across rows for a specific column in the following question types:
- Multi-Select Matrix
- Dynamic Matrix
Data Aggregation Methods
The following data aggregation methods are supported:
- Sum - Adds up all the values in a column to get the total.
- Count - Counts the number of entries in a column.
- Min - Finds the smallest value in a column.
- Max - Finds the largest value in a column.
- Avg - Calculates the mean value of the data in a column.
How to Add a Total to a Matrix Column
In this example, we create a Dynamic Matrix and populate one of its columns with choices selected in a preceding Multi-Select Dropdown question. For information on how to pipe choices to a Dynamic Matrix column, refer to the following guide:
How to Pipe Selected Choices to a Dynamic Matrix
To calculate the duration of each trip in days, we use the dateDiff() function, which you can learn more about in the dedicated guide:
How to Calculate Duration Between Dates and Prefill a Form Field with the Duration Value
To combine data from different rows within a Dynamic Matrix column, follow the steps below:
- Add a Dynamic Matrix to a form.
- Select the matrix column whose data you want to aggregate by clicking the area around the column title.
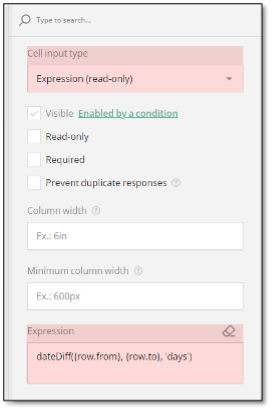
- Under General, locate the Cell input type property and set it to Expression (read-only).
- Locate the Expression field and enter the following value: dateDiff({row.from}, {row.to}, 'days'), where from is the column name (ID) of the start date and to is the column name (ID) of the end date of a visit.
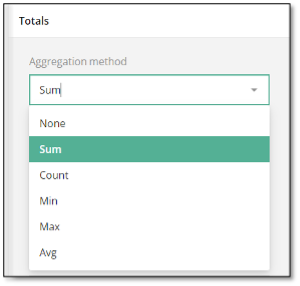
- Under Totals, locate the Aggregation method property and select the desired method.
- Locate the Formatted string property and enter the text format for the column total, where 0 will be replaced with the actual numerical value.
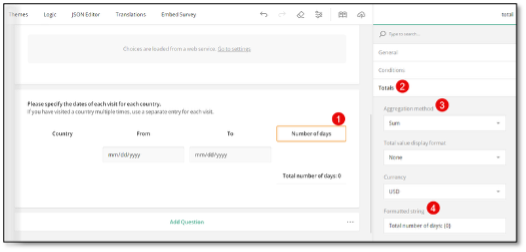
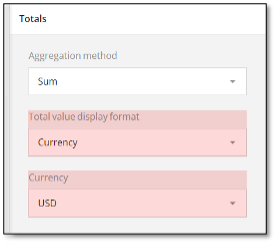
- (Optional) Modify the format type using the Total value display format property. For example, if you are aggregating monetary values, set the property to Currency and select the desired currency type using the Currency drop-down menu.
The resulting value will look as follows:
How to Sum Numerical Values Across Matrix Columns
In the previous example, we calculated the duration between two dates. If your matrix columns contain numerical values that you want to sum and display, use the sum() function instead of dateDiff() in step 4: sum({row.columnOneName}, {row.columnTwoName}). The rest of the steps are the same.
Limitations
Multi-Select Matrix columns do not support data formatting properties and only allow selection of an aggregation method.